There are several ways to increase page load speed by optimizing CSS:
- Minify CSS: Removing unnecessary whitespace, comments, and other redundant characters can significantly reduce the size of your CSS files, resulting in faster load times.
- Use CSS preprocessors: CSS preprocessors such as SASS and LESS allow you to use variables, functions, and other programming constructs to make your CSS more maintainable and organized.
- Use CSS frameworks: CSS frameworks such as Bootstrap and Foundation provide a set of pre-written CSS classes and layouts that can help you quickly create professional-looking websites without having to write your own CSS from scratch.
- Use CSS Grid and Flexbox: These CSS layout modules allow you to create flexible, responsive, and grid-based layouts without having to rely on complex CSS or JavaScript.
- Use CSS Sprites: Combine multiple images into a single image file, and then use CSS to display specific portions of the image as needed. This will reduce the number of HTTP requests and improve the page load speed.
- Use media queries: By using media queries, you can apply different CSS styles depending on the screen size, device, and other factors. This will help you to optimize the CSS for different devices and screen sizes, making the page load faster.
- Use Critical CSS: Critical CSS is the minimal set of CSS required to render the content of the above-the-fold area. By inlining this critical CSS into the head of the document and loading the rest of the CSS asynchronously, you can speed up the rendering of the above-the-fold content.
It’s worth mentioning that implementing these techniques should be balanced against maintainability, as a highly optimized but hard to maintain website will not be beneficial in the long run.
Removing excess and unused CSS improves page load speed because it reduces the size of the CSS files that need to be loaded by the browser. When a browser requests a web page, it has to download all the resources required to render the page, including the HTML, CSS, and JavaScript files. The larger these files are, the longer it takes for the browser to download and process them.
When excess and unused CSS is removed, the size of the CSS files is reduced, which means that they are smaller and faster to download. This can result in a noticeable improvement in page load speed, especially on slower internet connections or for users with older devices.
Additionally, removing excess and unused CSS also reduces the amount of code that the browser has to parse and interpret. This can make it easier for the browser to render the page, which can also improve the page load speed.
Furthermore, removing unused CSS also helps to improve the maintainability of the codebase and reduces the possibility of introducing bugs.
It’s important to note that removing CSS can be a difficult task, so it’s recommended to use tools like PurgeCSS, uncss, and Clean-CSS, to automate the process of detecting and removing unused CSS.
I’ve set up this Hugo website for SCSS. SCSS (Sassy CSS) is a CSS preprocessor that provides a set of features and tools to make CSS more maintainable, organized, and reusable. Some of the advantages of using SCSS include:
- Variables: SCSS allows you to use variables, which makes it easy to store and reuse common values such as colors, font sizes, and other design elements throughout your stylesheets.
- Nesting: SCSS allows you to nest selectors, which makes it easy to create more organized and readable stylesheets. This also reduces the amount of code you have to write and can make it easier to maintain your stylesheets.
- Mixins: SCSS allows you to create mixins, which are reusable groups of CSS styles that can be easily included in multiple selectors. This makes it easy to create consistent and reusable styles across your website.
- Functions: SCSS provides a set of built-in functions and math operators that can be used to perform calculations and manipulate values, making it easier to create complex and dynamic styles.
- Imports: SCSS allows you to split your stylesheets into smaller, more manageable files, and then import them into a single file. This can make it easier to organize and manage your stylesheets.
- Compatibility: SCSS files can be easily converted to regular CSS files, so it can be used with any web page, framework, and browser.
Using SCSS can help you to write more maintainable and reusable CSS code, which can save a lot of time and effort in the long run, Additionally, it can lead to a better developer experience, and by extension, a better user experience.
Optimising CSS with Hugo
We will be using a combination of selectively importing SCSS libraries and PurgeCSS. In this article I assume you’ve got SCSS up ad running in your Hugo website. To begin with you can take a look at Optimize for Boostrap 5, which points that that when using Sass in your asset pipeline, you should make sure you optimize Bootstrap by only @importing the components you need.
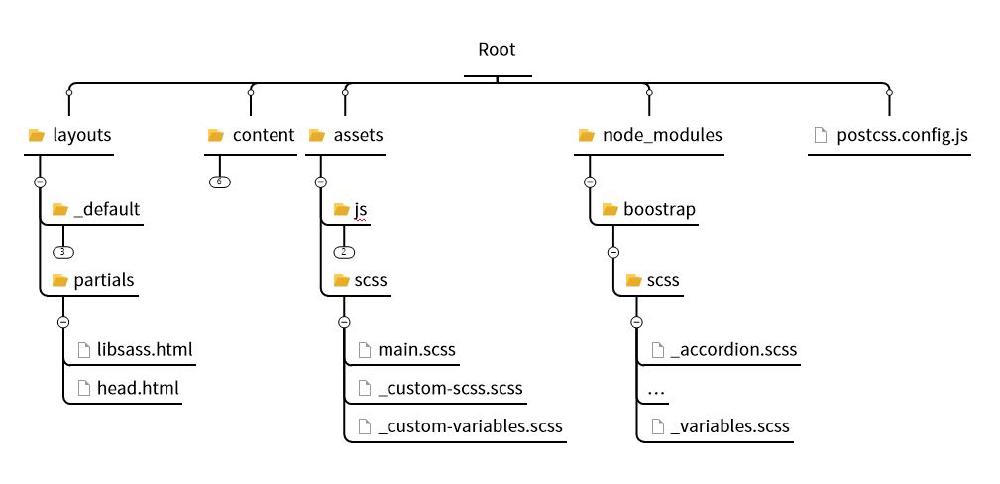
This is our reference folders structure:
Under main.scss in include the following modules (your case might be different, but this is what I’m using):
// Custom.scss
// Option B: Include parts of Bootstrap

// 1. Include functions first (so you can manipulate colors, SVGs, calc, etc)
@import 'bootstrap/scss/functions';

// 2. Include any default variable overrides here
@import 'custom-variables';

// 3. Include remainder of required Bootstrap stylesheets
@import 'bootstrap/scss/variables';

// 4. Include any default map overrides here

// 5. Include remainder of required parts
@import 'bootstrap/scss/maps';
@import 'bootstrap/scss/mixins';
@import 'bootstrap/scss/root';

// 6. Optionally include any other parts as needed
@import 'bootstrap/scss/utilities';

// class example

@import 'bootstrap/scss/reboot';
@import 'bootstrap/scss/type';
@import 'bootstrap/scss/images';
@import 'bootstrap/scss/containers';
@import 'bootstrap/scss/grid';
@import 'bootstrap/scss/helpers';

// 7. Optionally include utilities API last to generate classes based on the Sass map in `_utilities.scss`
@import 'bootstrap/scss/utilities/api';

// 8. Add additional custom code here
@import 'bootstrap/scss/mixins/banner';
@include bsBanner('');

// scss-docs-start import-stack
// Configuration

@import 'bootstrap/scss/utilities';

// Layout & components
@import 'bootstrap/scss/root';
@import 'bootstrap/scss/reboot';
@import 'bootstrap/scss/type';
@import 'bootstrap/scss/images';
@import 'bootstrap/scss/containers';
@import 'bootstrap/scss/grid';
@import 'bootstrap/scss/tables';
@import 'bootstrap/scss/forms';
@import 'bootstrap/scss/buttons';
@import 'bootstrap/scss/transitions';
@import 'bootstrap/scss/dropdown';
//@import "bootstrap/scss/button-group";
@import 'bootstrap/scss/nav';
@import 'bootstrap/scss/navbar';
@import 'bootstrap/scss/card';

//@import "bootstrap/scss/accordion";
@import 'bootstrap/scss/breadcrumb';

@import 'bootstrap/scss/pagination';
@import 'bootstrap/scss/badge';

//***
// @import "bootstrap/scss/alert";
// @import "bootstrap/scss/progress";
@import 'bootstrap/scss/list-group';
// @import "bootstrap/scss/close";
// @import "bootstrap/scss/toasts";
// @import "bootstrap/scss/modal";
// @import "bootstrap/scss/tooltip";
// @import "bootstrap/scss/popover";
@import 'bootstrap/scss/carousel';
// @import "bootstrap/scss/spinners";
// @import "bootstrap/scss/offcanvas";
// @import "bootstrap/scss/placeholders";
//***

// Helpers
@import 'bootstrap/scss/helpers';

// Utilities
@import 'bootstrap/scss/utilities/api';
// scss-docs-end import-stack
@import 'custom-scss';

// highlight.js
@import 'highlight.js/scss/dark';
What we are importing here are the Boostrap scss modules found within node_modules.
Next we install postcss (and autoprefixer) from the VS studio terminal:
npm install postcss postcss-cli
npm install autoprefixer
As a note, we are managing SCSS through the libsass.html partial:
{{$optsToCSS := (dict "transpiler" "libsass" "outputStyle" "compressed" "includePaths" (slice "node_modules"))}}

{{if eq hugo.Environment "development"}}
    {{$optsToCSS = (dict "transpiler" "libsass" "enableSourceMap" true "includePaths" (slice "node_modules"))}}
{{end}}

{{$css := resources.Get "scss/main.scss" | toCSS $optsToCSS | postCSS | fingerprint "md5"}}

<link rel="stylesheet" href="{{ $css.RelPermalink}}" integrity="{{$css.Data.Integrity}}">
libsass.html is called by head.html:
<link rel="stylesheet" href="/css/main.css" />
{{ partial "libsass" "scss/main.scss" }}
As you can see in libsass.html we transcode SCSS into CSS and then minify the CSS (if we aren’t running in development mode). We are also fingerprinting.
As I mentioned above, Postcss can “break” the site by removing too much css. If you notice something is missing, you might want to make sure the right classes are not removed by adding the following code in postcss.config.js:
const autoprefixer = require('autoprefixer')();

const purgecss = require('@fullhuman/postcss-purgecss')({
  content: ['./layouts/**/*.html', './content/**/*.md'],
  safelist: {
    // standard: [],
    // deep: [],
    greedy: [
      /^pagination/,
      /^page-/,
      /^nav-/,
      /^dropdown/,
      /^dropdown-/,
      /^btn/,
      /^tab-/,
      /^list-/,
      /^table-/,
      /^badge-/,
      /^row-/,
      /^col-/,
      /^container-/,
      /^bi/,
      /^matlab/,
      /^markdown/,
      /^javascript/,
      /^hljs/,
      /^language-/,
      /^line-/,
      /^text-/,
      /^highlight/,
    ],
  },
});

module.exports = {
  plugins: [
    ...(process.env.HUGO_ENVIRONMENT === 'development'
      ? [null]
      : [autoprefixer, purgecss]),
  ],
};
For example, if you notice that the code highlighter is not working properly you might want to add its corresponding class to the greedy list, by including /^hljs/.
As a final note, in the _custom-variables.scss I’m including and overriding certain scss variables. Some people just copy the entire node_modules\bootstrap\scss\_variables.scss in _custom-variables.scss, but that’s unnecessary. I’m only including the variables I need to override here.

