Overview: Stay away from WordPress
This is a summary of my experience in running a peer-reviewed journal using a WordPress+ plugins and custom MATLAB applications for the journal editorial process, typesetting, and publication. My honest suggestion is: stay away from WordPress (and similar database systems) and develop a custom serverless platform.
Here are a few reasons why you might not want to use WordPress for a peer-reviewed journal:
- Dependence on plugins: WordPress sites often rely heavily on plugins to add features and functionality. However, if a plugin is no longer maintained or conflicts with other plugins, it can break your site.
- Dependence on hosting platform server: changes in the remote server might break your WordPress site.
- Performance and Speed: WordPress sites can become slow and bloated if they are not optimized properly. This can lead to a poor user experience, and also affect search engine rankings.
- Limited Customization: While WordPress has a large number of plugins and themes available, it may still not be enough to meet your specific needs, which can limit the level of customization and automation you can achieve.
- Security: WordPress is a popular platform, which makes it an attractive target for hackers. To maintain the security of your site, you need to keep your WordPress installation and plugins up to date, and implement strong security measures.
- Cost: While WordPress itself is free, there can be costs associated with hosting, custom themes, and plugins, which can quickly add up.
My plan is to migrate the entire site from WordPress to Hugo. Right now, I believe this WordPress website is ridiculously complicated. There will be many advantages in doing this, including cleaner code, faster website, and free hosting.
The Peer-Review Process
The peer-review process is an essential part of the publication of research articles in academic journals. This process ensures that research articles are rigorously evaluated by experts in the field before they are published, ensuring that only high-quality and reliable research is disseminated to the scientific community.
The peer-review process typically starts when a researcher submits a research article to a journal. The article is then assigned to an editor, who is responsible for ensuring that the article is suitable for publication and that it adheres to the journal’s guidelines and standards. If the editor determines that the article is suitable for publication, they will send it out for peer review.
Peer review is a critical step in the publication process. It involves sending the article to two or more experts in the field, who are asked to evaluate the quality and validity of the research. These experts will typically review the article for accuracy, clarity, and completeness, and they may also provide suggestions for improvement.
Once the peer-review process is complete, the editor will receive the reviewer’s comments and recommendations. Based on this feedback, the editor will make a decision about whether to accept, reject, or ask the author to revise the article. If the article is accepted, it will be prepared for publication, which typically involves copy-editing, proofreading, and formatting.
Once the article is published, it will be available for the scientific community to read, comment on, and cite. This is an important step in the dissemination of knowledge and helps to advance the field by making new research findings available to others.
Peer-Reviewed Video Journals
A peer-reviewed video journal is a type of academic journal that specializes in publishing research articles in the form of videos. This format allows researchers to present their findings in a more interactive and visual way, and it can be especially useful for demonstrating complex processes, procedures, or techniques.
Just like traditional text-based academic journals, peer-reviewed video journals use a rigorous peer-review process to evaluate the quality and validity of submitted articles, from which the videos are produced.
The peer-review process is an important step in ensuring that only high-quality and reliable research is published in peer-reviewed video journals. It helps to ensure that the scientific community has access to the latest and most important research findings, and it helps to advance the field by making new research findings available to others.
Peer-reviewed video journals can be an excellent resource for researchers and students, as they provide an engaging and interactive way to learn about new research findings. They can also be a valuable tool for science communication, as they allow researchers to share their findings with a wider audience in an accessible and understandable way.
In summer 2017 I was contacted multiple times by a notorious peer-reviewed video journal, JOVE. The Journal of Visual Experiments (JOVE) is an academic, peer-reviewed video journal that specializes in publishing scientific research in the form of videos. JOVE is unique in that it focuses exclusively on publishing videos that demonstrate experimental techniques and procedures, making it an important resource for researchers and students in a wide range of scientific fields.
Since by then I had been working on video productions, my feeling was that the quality of the video productions offered by JOVE was suboptimal, especially considering their charges.
So, I decided to set up my own journal: Scientific Video Protocols.
Hosting and CMS costs
The costs involved in setting up a peer-reviewed journal can vary widely depending on the size and scope of the journal, as well as the level of professional services and support you require. Some of the most common costs associated with setting up a peer-reviewed journal include:
- Hosting and infrastructure costs: Depending on the platform you choose, you may need to pay for hosting, security, and backup services to keep your journal online and secure.
- Content management system (CMS) costs: Depending on the CMS you choose, you may need to pay licensing or subscription fees to access and use its features.
- Professional services costs: If you require professional services such as design, branding, and custom development, you may need to pay for these services on an ongoing basis.
- Printing and distribution costs: If you plan to print and distribute physical copies of your journal, you will need to budget for the costs of printing, shipping, and distribution.
- Editorial costs: You may need to pay for editing and proofreading services, as well as compensation for your editorial board and peer reviewers.
It’s important to keep in mind that these costs can add up quickly, and that you’ll need to budget carefully to ensure that your journal is financially viable in the long term.
My main concern when I started working on Scientific Video Protocols, a peer-reviewed video journal, was to minimize the hosting and CMS costs. I did some research and spoke to retailers that normally serve the likes of Elsevier and Springer, and the required invested started somewhere around £5000 per year. The advantage of using existing publishing platforms is that you don’t need spend much time on the development side and you can theoretically just focus on setting up the editorial workflow and how the published articles will look like. However, £5000 or more was not an option, so I started exploring free options.
There are several free options for setting up a peer-reviewed journal:
- Open Journal Systems (OJS): A free and open-source software platform for managing and publishing academic journals.
- Scholastica: A cloud-based platform that offers a free basic plan for small journals with limited submissions.
- JournalHosting: A free platform that offers a simple and straightforward way to start a peer-reviewed journal.
- PKP Publishing Services: A free and open-source platform that provides hosting and support services for OJS-powered journals.
These options allow you to set up and manage a peer-reviewed journal without incurring any significant costs, making them accessible to small, independent publishers and non-profit organizations, including predatory journals. Well, it turns out the majority of predatory journals use OJS.
My Experience with OJS
Open Journal Systems (OJS) is a free, open-source software platform that is used to manage the publishing process of academic journals. It is designed to support the management of the submission, peer-review, and publication of articles, as well as the distribution of published content.
OJS is a complex platform that includes many features and functions, including user management, submission tracking, peer-review management, and more. It is designed to be highly flexible and customizable, but this flexibility can also make it challenging to modify.
One reason why OJS can be difficult to modify is because it is built using complex code and architecture. This code is often written in PHP. Additionally, the codebase for OJS is large and complex, making it difficult to locate and modify specific parts of the platform.
Overall, while OJS is a powerful and flexible platform for managing academic journals, it can be challenging to modify for users who are not familiar with the code and architecture of the platform. This is why it is often recommended that users seek the help of a developer or technical expert when making modifications to OJS.
Installing OJS on a local XAMPP server
Here are the steps involved for installing Open Journal Systems (OJS) on a local server using XAMPP:
Install XAMPP: To install OJS, you need to have a web server installed on your local computer. XAMPP is a free and open-source web server that you can use for this purpose.
Download OJS: Visit the Open Journal Systems website to download the latest version of OJS. Save the downloaded file to your local computer.
Extract the OJS files: Extract the OJS files from the downloaded archive to a directory of your choice.
Copy the OJS files to the XAMPP htdocs folder: Copy the extracted OJS files to the htdocs folder inside the XAMPP installation directory.
Start XAMPP: Launch the XAMPP control panel and start the Apache and MySQL modules.
Create a database: Use the XAMPP phpMyAdmin tool to create a database for OJS.
Configure OJS: Open a web browser and navigate to the OJS installation page by entering the URL http://localhost/[path to OJS directory]/index.php/install. Follow the on-screen instructions to configure OJS, including entering information about your database, administrator account, and journal settings.
Complete the installation: Once you have completed the configuration process, follow the on-screen instructions to complete the installation of OJS.
Log in to OJS: Once the installation is complete, you can log in to the OJS backend by navigating to the URL http://localhost/[path to OJS directory]/index.php/index/login and entering your administrator username and password.
With these steps, you can install OJS on a local server using XAMPP and use it to manage and publish academic journals. Keep in mind that you may need to make additional modifications to your server configuration depending on your specific needs and requirements.
My experience didn’t really last long, as modifying functionalities and style of this website without a decent guide was nearly impossible. I did also look into PKP, but it was essentially the same story as OJS.
Hosting a Peer-Reviewed Journal with WordPress+
WordPress is a free and open-source content management system (CMS) used to create and manage websites. It was first released in 2003 and has since become one of the most popular website building platforms in the world, with millions of websites using it for a wide range of purposes, including blogs, portfolios, online stores, and more.
WordPress is known for its user-friendly interface, extensive customization options, and large community of users and developers. It provides users with a range of tools and features for creating and managing content, including a built-in editor, themes, and plugins, which can be used to extend the functionality of the platform.
WordPress is designed to be highly customizable and can be used to create websites of all types, including complex and feature-rich websites, as well as simple and straightforward sites. Additionally, it is built on open-source technology, making it freely available for anyone to use and modify.
A peer-reviewed journal can be developed with WordPress. However, this may require additional plugins and customization to fully support the peer-review process and publication of articles.
There are several plugins available for WordPress that can be used to support the peer-review process, including plugins for submission management, review management, and publication management. Some of these plugins are free, while others require a fee or subscription.
In addition to plugins, you may also need to make modifications to the WordPress theme and custom code to support the specific needs and requirements of your peer-reviewed journal.
Keep in mind that hosting a peer-reviewed journal on WordPress may also require additional resources, including hosting and support, as well as expertise in using WordPress and related plugins. It may also require more time and effort to set up and manage than using a dedicated platform like Open Journal Systems.
Overall, while it is possible to host a peer-reviewed journal on WordPress, it may not be the best option for everyone, and you may need to consider the costs, resources, and expertise required to make it work effectively.
Installing WordPress on a remote server
Since I already had a web hosting account with BlueHost with several WordPress websites already running in it. This step was relatively straightforward.
Here are the steps involved for installing WordPress from scratch on BlueHost:
- Sign up for a BlueHost account: Visit the BlueHost website to sign up for an account. Choose a plan that meets your needs and complete the sign-up process.
- Log in to BlueHost: Log in to your BlueHost account and navigate to the “Hosting” section.
- Install WordPress: In the “Hosting” section, click on the “Install WordPress” button. Follow the on-screen instructions to install WordPress on your BlueHost account.
- Select a domain: Choose the domain you want to use for your WordPress website and complete the setup process.
- Complete the installation: Follow the on-screen instructions to complete the WordPress installation process, including setting up a username and password for your WordPress admin account.
- Log in to WordPress: Once the installation is complete, log in to your WordPress admin dashboard by navigating to
http://[your domain name]/wp-admin and entering your username and password. - Customize your site: From the WordPress dashboard, you can start customizing your site by choosing a theme, adding plugins, and creating pages and posts.
Optional – Installing WordPress on a local server
You might also consider developing your WordPress site on a local machine. WordPress on its own is extremely slow. Editing on a remote live sever is even slower. There are several advantages to developing a WordPress site on a local machine, including:
- Speed and performance: Developing a WordPress site on a local machine can be faster and more responsive than developing on a live server, as it eliminates the need to transfer data over the internet.
- Convenience: Developing a WordPress site locally allows you to work on it anytime, anywhere, without the need for an internet connection.
- Cost-effective: Developing a WordPress site locally eliminates the need to purchase a hosting account, which can save you money.
- Increased security: Developing a WordPress site locally reduces the risk of hacking and other security threats, as the site is not accessible from the internet.
- Easy testing: Developing a WordPress site locally allows you to test and experiment with plugins, themes, and other features without affecting the live site.
- Better collaboration: Developing a WordPress site locally allows multiple team members to work on the site at the same time, without the need for remote access.
If you already have a live WordPress website and you want to deploy it on a local XAMPP server, you can do the following:
- Install the Duplicator plugin: On your live WordPress site, log in to your WordPress dashboard and install the “Duplicator” plugin.
- Create a package: Once the plugin is installed, go to the “Duplicator” menu item in your WordPress dashboard and click on “Packages”. Then click on the “Create New” button to create a new package.
- Download the package: Once the package is created, click on the “Installer” and “Archive” download links to download both files to your computer.
- Start XAMPP: Start the Apache and MySQL modules in the XAMPP control panel.
- Create a database: Open a web browser and navigate to
http://localhost/phpmyadmin/ to access the PHPMyAdmin interface. Create a new database for your WordPress installation. - Copy the package: Copy the “Installer” and “Archive” files to the “htdocs” folder in your XAMPP installation directory (e.g.
C:\xampp\htdocs\new_folder) - Run the installer: Open a web browser and navigate to
http://localhost/[your folder name]/installer.php to run the Duplicator installer. - Configure the installer: Follow the on-screen instructions to configure the installer, including entering the information for your database, username, and password (and never use root root!!).
- Test the site: Once the installation is complete, open a web browser and navigate to
http://localhost/[your folder name] to access your local WordPress site. Verify that everything is working as expected.
By following these steps, you can deploy an existing WordPress site on a local XAMPP server using the “Duplicator” plugin. This allows you to test and develop your site locally, before deploying it to a live server.
You can also check out this step-by-step guide.
Custom fields in WordPress are metadata fields that allow you to add extra information to your posts, pages, and custom post types. These fields can be used to store and display additional information such as date, location, and author information.
The Toolset plugin is useful because it makes it easy to create custom fields and custom post types in WordPress, without the need for any coding. With Toolset, you can create custom fields with a visual interface, which makes it easy to add and manage custom data on your WordPress site.
The Toolset plugin also offers a range of other features that are useful for customizing and extending your WordPress site, such as custom taxonomies, custom templates, and custom database tables. Additionally, Toolset integrates with other plugins and themes, making it easy to extend the functionality of your site without the need for complex coding.
Overall, the Toolset plugin is a powerful tool for customizing and extending your WordPress site, making it easier to add and manage custom fields, custom post types, and other custom data.
Cost: about £56/year (2023)
Elementor
Elementor is a popular WordPress plugin that provides a visual page builder for creating custom pages and templates on your WordPress site. It allows you to design custom pages and posts using a drag-and-drop interface, without needing to write any code.
With Elementor, you can add various types of elements to your pages, including text, images, buttons, videos, and more. The plugin provides a range of pre-designed templates and blocks, which you can customize to fit your needs. You can also create custom headers, footers, and templates, which can be used across your entire site.
Elementor is designed to be user-friendly and accessible to users of all skill levels. It provides a live editing experience, so you can see your changes in real-time as you make them. The plugin is also fully responsive, so your pages will look great on all devices, including desktop, tablet, and mobile.
Overall, Elementor is a powerful tool for creating custom pages and templates on your WordPress site, without needing to write any code. It is a popular choice for web designers, website owners, and content creators who want to create professional-looking pages and templates quickly and easily.
Cost: about £80/year (2023)
Developing Custom Plugins for WordPress
Writing a custom plugin for WordPress involves several steps:
- Creating a folder: Create a new folder in the
wp-content/plugins directory of your WordPress installation and name it after your plugin. - Writing the plugin header: Create a new file in the folder named
plugin-name.php and add a header at the top of the file with plugin information, including the plugin name, author, version, and description. - Writing the plugin code: Add the functions and code that will make your plugin do what it’s supposed to do. You can use WordPress functions, hooks, and actions to create the functionalities you want.
- Activating the plugin: Login to your WordPress site, go to the “Plugins” page and activate your custom plugin.
- Testing: Test your plugin to make sure it works as intended.
A shortcode in WordPress is a small piece of code that can be added to a post, page, or widget to execute a specific function or display dynamic content. To add a plugin to your page using a shortcode, you need to follow these steps:
Here is a sample plugin header:
<?php
/*
Plugin Name: My Custom Plugin
Plugin URI: http://www.mywebsite.com/my-custom-plugin
Description: This is a custom plugin that does XYZ.
Author: John Doe
Version: 1.0
Author URI: http://www.mywebsite.com
*/
A shortcode in WordPress is a small piece of code that can be added to a post, page, or widget to execute a specific function or display dynamic content. To add a plugin to your page using a shortcode, you need to follow these steps:
- Find the shortcode: Look in the plugin documentation or settings page to find the shortcode that corresponds to the functionality you want to add to your page. The shortcode will usually be in the format of [shortcode_name].
- Add the shortcode to your page: Go to the page or post where you want to add the plugin and switch to the “Text” editor. Then, simply paste the shortcode where you want it to appear.
You can take a look at this guide.
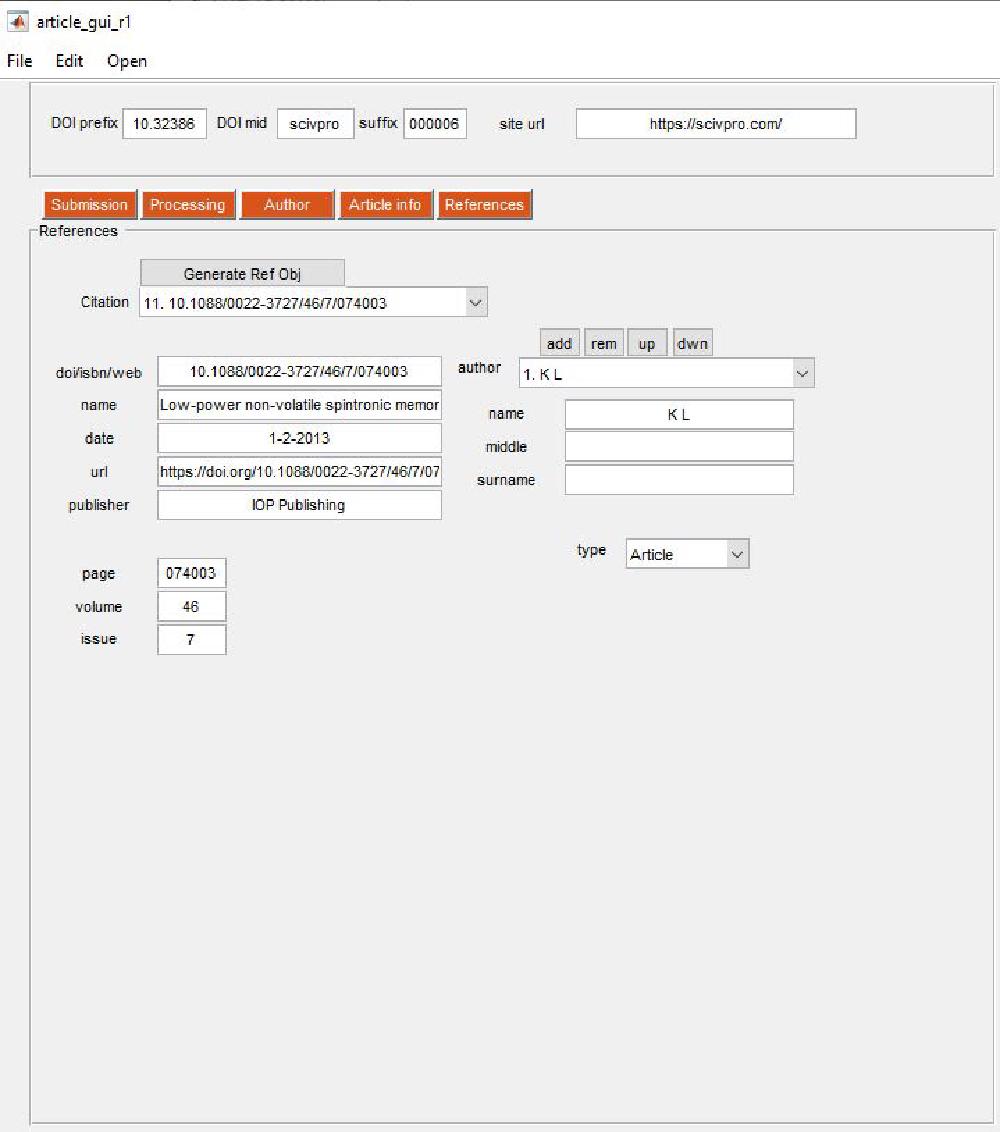
A custom typesetting editorial MATLAB software
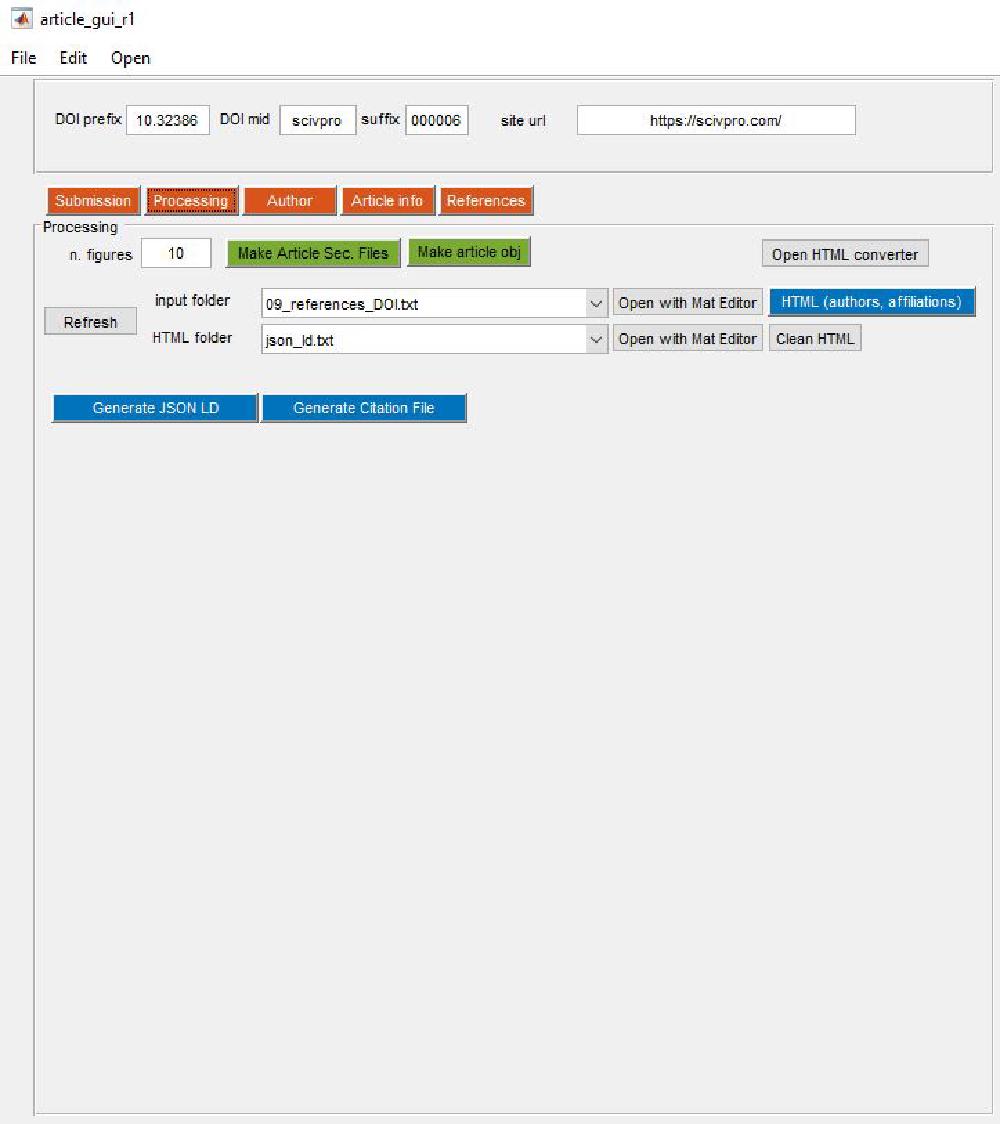
I designed a MATLAB application that take care of salient aspects of the typesetting process, one a manuscript is accepted for publication. With Scientific Video Protocols we publish both standard articles (HTML + pdf) and video articles (YouTube).
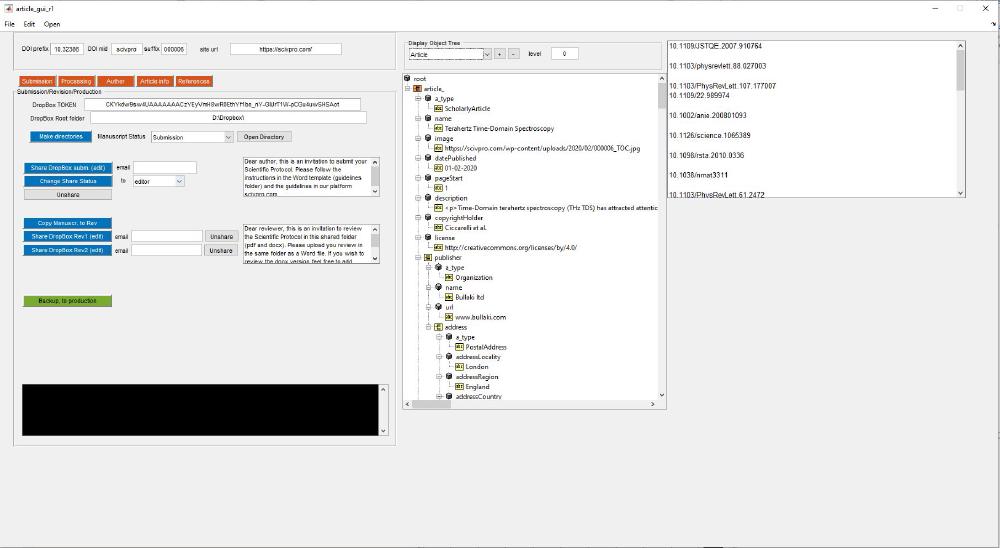
This the application interface:
I’ve built this using MATLAB Guide. MATLAB’s “guide” is a GUI development environment that was included in earlier versions of MATLAB. It allowed users to create graphical user interfaces (GUIs) for their MATLAB applications using a simple drag-and-drop interface. Recently, MATLAB has replaced guide with a newer and more powerful GUI development environment called App Designer. App Designer provides a modern, streamlined interface for designing and coding MATLAB apps and provides more control over the look and behaviour of the app compared to guide. Additionally, App Designer uses object-oriented programming concepts and integrates with other MATLAB tools and features, making it easier to create more complex and sophisticated apps.
Moreover guide has been officially deprecated in recent versions of MATLAB and will no longer be supported in future releases. MathWorks, the company behind MATLAB, has encouraged users to transition to the newer App Designer for their GUI development needs. With its improved functionality and integration with other MATLAB tools, App Designer provides a more robust and efficient platform for creating MATLAB apps compared to guide.
The first step is to assign a suffix for the DOI. We assign DOIs with CrossRef and this is an example of URL: https://doi.org/10.32386/scivpro.000006.
Pressing Make Directories (Call back: MAKE_DIRECTORIES.m) creates a series of directories used throughout the editorial process.
%% Submission Directories
handles.data.dataDir.root = [handles.data.workDir handles.data.doi_suffix '\']; mkdir(handles.data.dataDir.root);

handles.data.dataDir.submission.root = [handles.data.dataDir.root  'submission\']; mkdir(handles.data.dataDir.submission.root);
handles.data.dataDir.submission.guidelines = [handles.data.dataDir.submission.root 'guidelines\'];  mkdir(handles.data.dataDir.submission.guidelines);
handles.data.dataDir.submission.manuscript = [handles.data.dataDir.submission.root 'manuscript\'];  mkdir(handles.data.dataDir.submission.manuscript );
handles.data.dataDir.submission.figures = [handles.data.dataDir.submission.root 'figures\'];  mkdir(handles.data.dataDir.submission.figures);
handles.data.dataDir.submission.supporting = [handles.data.dataDir.submission.root 'supporting\'];  mkdir(handles.data.dataDir.submission.supporting);
handles.data.dataDir.submission.agreement = [handles.data.dataDir.submission.root 'agreement\'];  mkdir(handles.data.dataDir.submission.agreement);

% Transfer data to submission directories
handles.data.assetsDir = [handles.data.workDir 'assets\'];

copyfile([handles.data.assetsDir 'SciVPro_template_with_instructions.dotm'], [handles.data.dataDir.submission.guidelines 'SciVPro_template_with_instructions.dotm'], 'f');
copyfile([handles.data.assetsDir 'SciVPro_Ref.ens'], [handles.data.dataDir.submission.guidelines 'SciVPro_Ref.ens'], 'f');

%% Review Directories
handles.data.dataDir.review.root = [handles.data.dataDir.root  'review\']; mkdir(handles.data.dataDir.review.root);
handles.data.dataDir.review.reviewer1 = [handles.data.dataDir.review.root  'reviewer1\']; mkdir(handles.data.dataDir.review.reviewer1);
handles.data.dataDir.review.reviewer2 = [handles.data.dataDir.review.root  'reviewer2\']; mkdir(handles.data.dataDir.review.reviewer2);

%% Production Directories
handles.data.dataDir.production.root = [handles.data.dataDir.root  'production\']; mkdir(handles.data.dataDir.production.root);
handles.data.dataDir.production.paragraphs = [handles.data.dataDir.root  'paragraphs\']; mkdir(handles.data.dataDir.production.paragraphs);

handles.data.dataDir.production.submision.root = [handles.data.dataDir.production.root  'submission\'];  mkdir(handles.data.dataDir.production.submision.root);

handles.data.dataDir.production.submision.manuscript = [handles.data.dataDir.production.submision.root  'manuscript\'];  mkdir(handles.data.dataDir.production.submision.manuscript);
handles.data.dataDir.production.submision.figures = [handles.data.dataDir.production.submision.root  'figures\'];  mkdir(handles.data.dataDir.production.submision.figures);
handles.data.dataDir.production.submision.supporting  = [handles.data.dataDir.production.submision.root  'supporting\'];  mkdir(handles.data.dataDir.production.submision.supporting);
handles.data.dataDir.production.submision.agreement = [handles.data.dataDir.production.submision.root  'agreement\'];  mkdir(handles.data.dataDir.production.submision.agreement);

handles.data.dataDir.production.temp.root       = [handles.data.dataDir.production.root  'temp\'];  mkdir(handles.data.dataDir.production.temp.root);
handles.data.dataDir.production.temp.paragraphs = [handles.data.dataDir.production.temp.root  'paragraphs\'];  mkdir(handles.data.dataDir.production.temp.paragraphs);
handles.data.dataDir.production.temp.captions   = [handles.data.dataDir.production.temp.root  'captions\'];  mkdir(handles.data.dataDir.production.temp.captions);

handles.data.dataDir.production.figures.root = [handles.data.dataDir.production.root  'figures\'];  mkdir(handles.data.dataDir.production.figures.root);
handles.data.dataDir.production.figures.captions = [handles.data.dataDir.production.figures.root  'captions\'];  mkdir(handles.data.dataDir.production.figures.captions);
handles.data.dataDir.production.figures.images = [handles.data.dataDir.production.figures.root  'images\'];  mkdir(handles.data.dataDir.production.figures.images);

handles.data.dataDir.production.files = [handles.data.dataDir.production.root  'files\'];  mkdir(handles.data.dataDir.production.files);

guidata(hObject, handles);
I normally reduce the figures down to 150KB. The standard size for both manuscript and website figures is 939 x 495 pixels. For the thumbnails I use 150 x 150 pixels. This is not the best image size management. Deploying SRCSET is a better solution.
Building HTML files
The first step is to build an article object by pressing Make article obj:
This is the corresponding button callback:
function pushbutton74_Callback(hObject, eventdata, handles)
% hObject    handle to pushbutton74 (see GCBO)
% eventdata  reserved - to be defined in a future version of MATLAB
% handles    structure with handles and user data (see GUIDATA)
handles.data.article = ClassArticle;
guidata(hObject, handles);
This is ClassArticle:
% ClassArticle(name, image, datePublished, pageStart, doi, description, ...
%                                    copyrightHolder, license, authors, publisher)

% On the class handle: it allows avoiding duplicates. In fact we separately
% create objects ClassArticle and ClassAffiliation. Then we assign a field
% of the Article object to a bunch of Affiliations. However if we modify
% the single Affiliations, changes won't be reflected on the Article unless
% the ClassArticle is a subclass of handle

classdef ClassArticle < handle
    properties (Constant)
        a_type = 'ScholarlyArticle'; % cannot be modified
    end
    properties
        name
        image
        datePublished
        pageStart
        description
        copyrightHolder
        license
        publisher = ClassPublisher;
        author = ClassAuthor;
        sameAs
        url
        keywords
        isPartOf = ClassIssue;
        citation
    end

    properties (Dependent)
        headline
        dateCreated
        copyrightYear

    end

    methods
        function obj = set.name(obj, Value)
            if ischar(Value)
                obj.name = Value;
            else
                error('Name must be a string');
            end
        end
         %% Image
        function obj = set.image(obj, Value)
            %if checkIfImageExists( Value)
                obj.image = Value;
            %else
            %    error('Image is not a valid URL directing to an image');
            %end
        end
        %% datePublished
        function obj = set.datePublished(obj, Value)
                obj.datePublished = Value;
        end

         %% dateCreated
        function dateCreated = get.dateCreated(obj)
            dateCreated = obj.datePublished;
        end

        %% pageStart
        function obj = set.pageStart(obj, Value)
                 obj.pageStart = Value;

        end

        %% description
        function obj = set.description(obj, Value)
            if ischar(Value)
                obj.description = Value;
            else
                error('Description must be a string');
            end
        end

        %% copyrightHolder
        function obj = set.copyrightHolder(obj, Value)
            if ischar(Value)
                obj.copyrightHolder = Value;
            else
                error('copyrightHolder must be a string');
            end
        end

        %% copyrightYear
        function copyrightYear = get.copyrightYear(obj)
            if ~isempty(obj.datePublished)
                copyrightYear = num2str(year(datetime(obj.datePublished,'InputFormat','dd-MM-yyyy')));
            else
                copyrightYear = '';
            end
        end

        %% Authors
        function obj = set.author(obj, Value)
            if iscell(Value)
                for i = 1 : numel(Value)
                    if isa(Value{1}, 'ClassAuthor')
                        obj.author{i} = Value{i};
                    else
                        error([num2str(i), '-th element not a ClassAuthor']);
                    end
                end
            else

                if  isa(Value, 'ClassAuthor')
                    obj.author = Value;
                else
                    error('Not a ClassAuthor');
                end

            end
        end

        %% license
        function obj = set.license(obj, Value)
                obj.license = Value;
        end

        % publisher
        function obj = set.publisher(obj, Value)
            if isa(Value, 'ClassPublisher')
                obj.publisher = Value;
            else
                error('Is not a valida Publisher Class');
            end
        end

        %% Headline
        function headline = get.headline(obj)
            headline = obj.name;
        end

        % isPartOf
        function obj = set.isPartOf(obj, Value)
            if isa(Value, 'ClassIssue')
                obj.isPartOf = Value;
            else
                error('Is not a valida Publisher Class');
            end
        end

        % Keywords
        function obj = set.keywords(obj, Value)
            if true
                obj.keywords = Value;
            else
                error('sdf');
            end
        end

        % SameAs
        function obj = set.sameAs(obj, Value)
               obj.sameAs =Value;
        end

        function doi = getDOI(obj)
            if ~isempty(obj.sameAs)
                doi = erase(obj.sameAs,'https://doi.org/');
            else
                doi = [];
            end
        end

        % url
        function url = get.url(obj)
            url = obj.sameAs;
        end

        % citation
        function obj = set.citation(obj, Value)

            if true
                obj.citation = Value;
            else
                error('Is not a valida Publisher Class');
            end
        end
    end
end
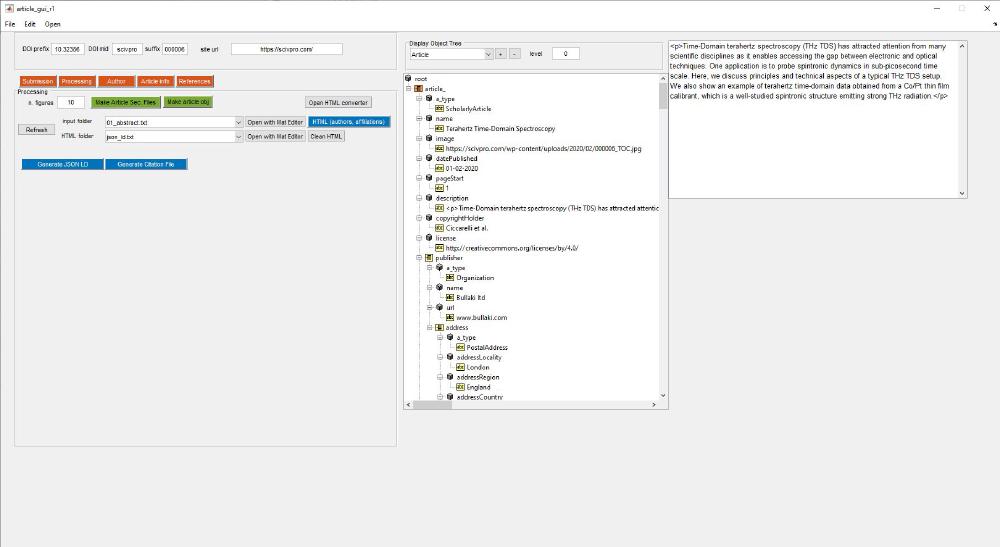
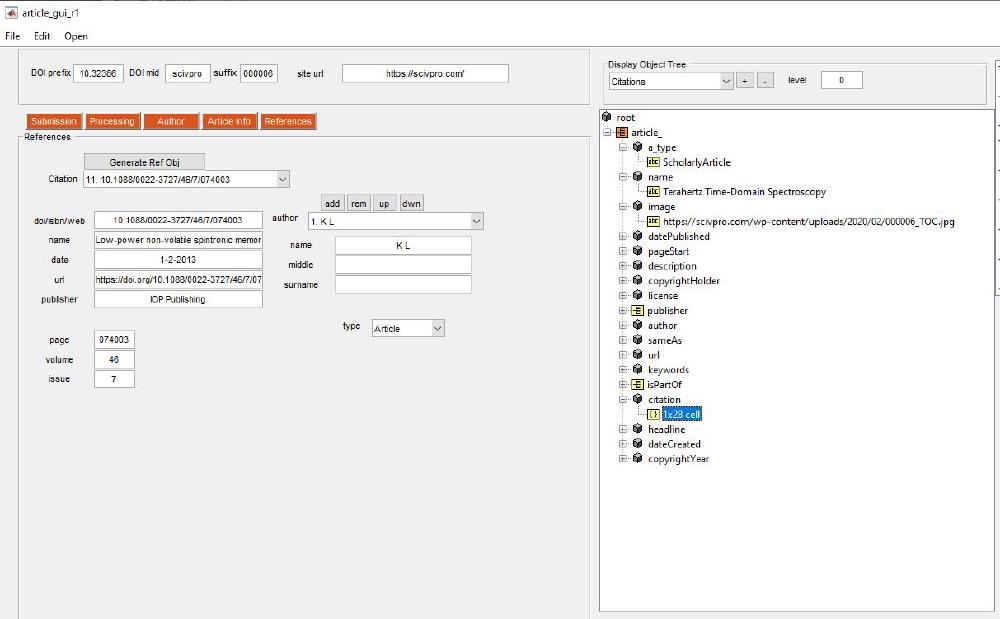
There are a series of subclasses within the class article: ClassPublisher, ClassAuthor, ClassIssue. This is were we store all the information related to this specific article. On the right-hand side of the GUI there a class explorer that allows you to visualize the object content. We can find its related code under the callback for the dropdown menu under Display Object Tree, which calls SHOW_STRUCT_TREE. This script makes a series of recursive calls to explore the full object tree. As you populate the fields in the app, values will be reflected in the object tree, this includes things like authors names, affiliations, etc.
root = uitreenode('v0','root','root',[],false);
mtree = uitree('v0','Root',root,'Parent');
set(mtree, 'Position', [730 250 480 610]);
switch handles.popupmenu12.Value
    case 1
    case 2 % article
        article_ = struct();
        article_ = recursiveStructConvert(handles.data.article,article_)
        root_.article_ = article_;
    case 3 % author
        author_ = struct();
        author_ = recursiveStructConvert(handles.data.author,author_)
        root_.author_ = author_;
    case 4
        affiliation_ = struct();
        affiliation_ = recursiveStructConvert(handles.data.affiliation,affiliation_)
        root_.affiliation_ = affiliation_;
    case 5
        publisher_ = struct();
        publisher_ = recursiveStructConvert(handles.data.publisher,publisher_)
        root_.publisher_ = publisher_;
    case 6
        citations = struct();
        for i = 1 : numel(handles.data.article.citation)
            citations(i).citation_ = struct();
            citations(i).citation_  = recursiveStructConvert(handles.data.article.citation{i},citations(i).citation_);
        end
        root_.citation_ = citations;
end
structTraverse(root_,root)
mtree.reloadNode(root)
expandChild(mtree, root, str2num(handles.edit93.String));
guidata(hObject, handles);
The first two functions uitreenode and uitree simply take care of building the object three and displaying it. This is the recursive function:
function s = recursiveStructConvert(obj, s)

for i = 1:numel(obj)
        properties_list = properties(obj(i));
        for j = 1 : numel(properties_list)
            if isobject(obj(i).(properties_list{j}))
                s(i).(properties_list{j}) = '';
                s(i).(properties_list{j}) = recursiveStructConvert(obj(i).(properties_list{j}),s(i).(properties_list{j}));
            else
                s(i).(properties_list{j}) = obj(i).(properties_list{j});
                if isempty(obj(i).(properties_list{j}))
                    s(i).(properties_list{j}) = 'null';
                end
            end

        end
end
The next step is to enter the number of figures, and click on Make Article Sec. Files. This will create txt files corresponding to each section of the manuscript. Manuscript sections are: abstract, introduction, protocol, results, etc.
We typically receive manuscripts in Microsoft Word. Authors are given Word template they can work with. This is handy because, if there’s any formatting and references we can convert the Word document directly into HTML using an HTML converter. Here are some of the steps we follow to ensure the conversion is correct:
- References must be inserted using EndNote and we have a specific style for the HTML conversion (
SciVPro_Ref_HTML) - In the Word file we need to remove any indentations
- For Figures to appear add a placeholder like [figure1]
- Figure files must be named as Figure1, Figure2, etc. … if there are more than 10 figures name them as Figure01, Figure02, … etc.
- Do NOT bold Figures
Clicking on Open HTML converter will open Word to HTML. The HTML code must be copied and pasted into the MATLAB app using the MATLAB file editor. To do that select the right section from the dropdown next to input folder (for example 01_abstract.txt) and click on Open with Mat Editor. The reason why we are entering the HTML code from the editor is because entering it from an hypothetical text box would introduce, for unknown reasons, weird characters. After pasting the HTML into 01_abstract.txt and saving, you can visualise in the application:
You’ll have to repeat this step for all article sections. You’ll notice there are two *.txt files named references. In the first one 08_references.txt we enter the bit generated by EndNote at the end of the article after converting it into HTML, which should look like:
<p>[1] M. Dressel, N. Drichko, B. Gorshunov & A. Pimenov. THz spectroscopy of superconductors. <em>IEEE Journal on Selected Topics in Quantum Electronics</em> <strong>14</strong>, 399-406, (2008).</p>
<p>[2] R. A. Kaindl, M. A. Carnahan, J. Orenstein, D. S. Chemla, H. M. Christen, H.-Y. Zhai, M. Paranthaman & D. H. Lowndes. Far-Infrared Optical Conductivity Gap in Superconducting MgB2 Films. <em>Physical Review Letters</em> <strong>88</strong>, (2002).</p>
<p>[3] M. Beck, M. Klammer, S. Lang, P. Leiderer, V. V. Kabanov, G. N. Gol'Tsman & J. Demsar. Energy-gap dynamics of superconducting NbN thin films studied by time-resolved terahertz spectroscopy. <em>Physical Review Letters</em> <strong>107</strong>, (2011).</p>
The second file is 09_references_DOI.txt and there you should paste the list of DOIs from the references, in the exact same order:
10.1109/JSTQE.2007.910764
10.1103/physrevlett.88.027003
10.1103/PhysRevLett.107.177007
The way we get this list is by switching to the SciVPro_DOI style. This will show the list of references at the end of the Word document as a list of DOIs. If the reference DOI does not exist we can enter an ISBN (if it’s a book) or a URL (for anything else). Obviously you need to make sure each reference in EndNote has an associated DOI (or a ISBN or a URL).
Manuscript metadata in peer-reviewed articles refers to the descriptive information about the paper and its authors that is included in the article, typically in the header or footer of the manuscript. This information can include the title of the paper, the names and affiliations of the authors, the date the paper was submitted or accepted, the name and volume number of the journal in which the paper was published, and other information that is relevant to the paper or the publishing process. The purpose of manuscript metadata is to provide context and background information about the paper, to help readers understand the context in which the research was conducted and to provide a reference for future researchers.
RESTful APIs available with CrossRef (free) or Scopus (paid) allow developers to access such a metadata by providing a DOI as an input. When registering a DOI with CrossRef we enter this data in their system. In essence the manuscript metadata represents key bibliographic information.
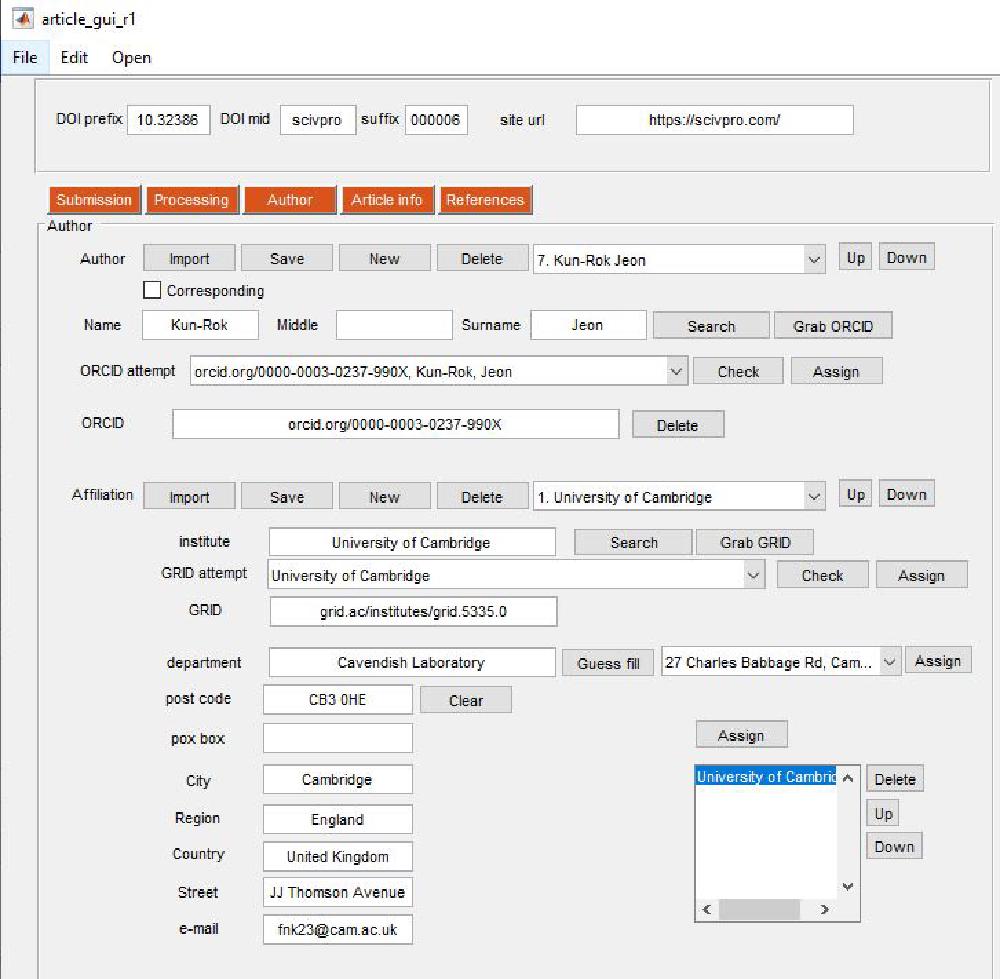
From this panel we enter Author and Affiliation information. This is the boring part. Author and Affiliation objects can be saved and imported.
Authors
You create a new Author by pressing New. Tick the checkbox if the author is a corresponding author. The email of the corresponding author is assigned by linking a certain author to a certain affiliation where the email is provided (this is discussed below). Enter Name and Surname, then attempt a Search. This will open the ORCID website and does a search based on the Name and Surname you’ve just entered. This is the script SEARCH_ORCID that is called when pressing the button:
name = handles.edit4.String;
surname = handles.edit6.String;
[stat,handles.webh]  = web(['https://orcid.org/orcid-search/quick-search?searchQuery=' name '+' surname])
guidata(hObject, handles);
The query is relatively simple and it is done at the URL level.
When we press Grab ORCID the list of ORCIDs will be transferred to the dropdown menu next to ORCID attempt. This is done with GRAB_ORCIDS:
data = get(handles.webh, 'HtmlText');
close(handles.webh);
newStr = extractBetween(data,'<td class="search-result-orcid-id">','<!---->');
for i = 1: length(newStr)
   s = extractBetween(newStr{i}, '','</td><td>');
   s{1} = erase(s{1},'https://');
   b = extractBetween(s{1}, '<a href="','">');
   popupText{i} = [b{1} ', ' s{2} ', ' s{3}];
   handles.data.tempORCIDlist{i} = b{1};
end
handles.popupmenu3.String = popupText;
guidata(hObject, handles);
The code involves scraping some bits of HTML from the ORCID page to extract ORCID and corresponding name. Typically when a query is performed ORCID returns a list of names. It will be up to you to select the correct ORCID. Once you’ve identified the correct ORCID just select it from the dropdown menu and press Assign. This will trigger ASSIGN_ORCID:
handles.edit3.String = handles.data.tempORCIDlist{handles.popupmenu3.Value};
author_index = handles.popupmenu2.Value;
handles.data.author(author_index).sameAs  = handles.edit3.String;
handles.data.author(author_index)
guidata(hObject, handles);
As you can see we are populating a structure called data with fields like author and so on. You can add a new author by pressing again New. Authors can be deleted by pressing Delete. Authors order can be arranged with the Up and Down buttons.
Affiliations
Affiliation can be added in a similar fashion. Enter the institute name and attempt an institute search from the GRID website (GRID is a unique affiliation identifier). You can perform a search on the GRID database by clicking on Search. Select the appropriate GRID and perform a Check. If the GRID is correct press Assign. Note that fields will be automatically filled. You can also manually add the affiliation details (in case GRID is not available or in case GRID details are wrong). Add the email of the corresponding author here.
Linking Authors and Affiliations
We assign affiliations to authors with this panel. You must select the appropriate author and affiliation from the respective popup menus and then click Assign. The order of the affiliation can be changed by pressing Up and Down. The link can be removed by pressing Delete. Make sure everything has been correctly assigned.
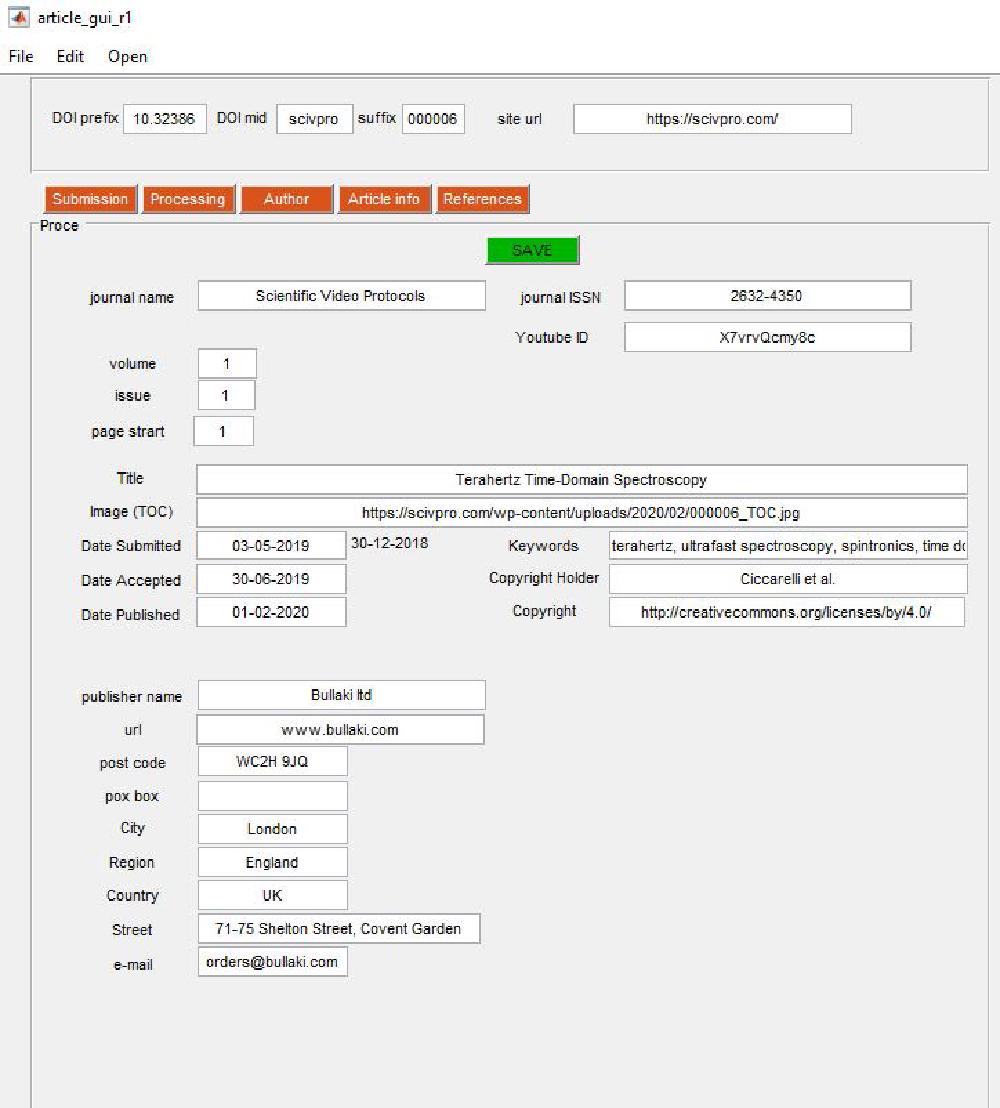
Article Information
This is accessed by clicking on the Article Info tab:
Journal information data is entered here (self-explanatory). The copyright holder is always first_author_surname et al..
For the table of content (TOC) image we use a square image size of 200 x 200 pixels. The TOC must be saved in https://scivpro.com/wp-content/uploads/2019/02/000008_TOC.jpg (the year, month, and DOI suffix will change obviously).
Once you are done, you must press SAVE. This will call the following scripts:
GENERATE_PUBLISHER
GENERATE_JOURNAL_VOL_ISSUE
GENERATE_ARTICLE_INFO
For example GENERATE_PUBLISHER:
addressPublisher = ClassAddress;
addressPublisher.addressLocality = handles.edit34.String;
addressPublisher.addressRegion = handles.edit35.String;
addressPublisher.addressCountry = handles.edit36.String;
addressPublisher.postOfficeBoxNumber = handles.edit33.String;
addressPublisher.postalCode = handles.edit32.String;
addressPublisher.streetAddress = handles.edit37.String;
addressPublisher.email = handles.edit38.String;
handles.data.article.publisher = ClassPublisher;
handles.data.article.publisher.name =handles.edit30.String;
handles.data.article.publisher.url = handles.edit31.String;
handles.data.article.publisher.address = addressPublisher;
guidata(hObject, handles);
References
References are managed via this panel:
The way this works is that the DOI (or ISBN or URL) list provided by pasting the list of DOIs in the file 09_references_DOI.txt is used to extract metadata relative to each DOIs. For DOIs we check the CrossRef database. If information is wrong, missing, or incorrect you can make appropriate modifications. Press Generate Ref Obj to retrieve references information from CrossRef. The reason why we do this is because we want to extract the metadata from each reference in a machine readable manner. This will be used on a later stage to build a JSON-LD file. I’ve noticed most publishers don’t bother including a JSON-LD file, however Nature does and this helps search engines; it is in fact suggested by Google.
filename = ([handles.data.dataDir.production.temp.paragraphs handles.popupmenu1.String{9}]); % open(filename)
DOIarray = importDOIfromTxt(filename);
% Examples of ISBN:
% '9783319966663' (3 authors)
% '9781860943492' (1 author)
for i = 1 : numel(DOIarray)
   i
   handles.data.article.citation{i} = check_doi(DOIarray{i});
end
% Citation can be the following Objects:
% DOI, BOOK, website, for arxiv just provide website info as it is not an
% article.
for i = 1 : numel(DOIarray)
    switch handles.data.article.citation{i}.a_type
        case 'ScholarlyArticle'
            handles.popupmenu15.String{i} = [num2str(i) '. ' getDOI(handles.data.article.citation{i})];
        case 'WebSite'
            handles.popupmenu15.String{i} = [num2str(i) '. ' handles.data.article.citation{i}.url];
    end
end
DISPLAY_CITATION
guidata(hObject, handles);
Here we first import the DOI string from the text file with importDOIfromTxt:
% Copy references into a txt file
function DOIarray = importDOIfromTxt(filename)
fid = fopen(filename);
counter = 1;
while ~feof(fid)
    newLine = fgets(fid);
    DOIarray{counter} = strtrim(newLine);
    counter = counter +  1 ;
end
fclose(fid);
Then we do the API call to CrossRef with check_doi.m:
function obj = check_doi(doi) % returns object and struct
options = weboptions;
options.Timeout = 15;
type =[];
request = ['http://api.crossref.org/works/' doi '/agency'];
try
    data = webread(request, options);
    doiAgency =  data.message.agency.label;
catch ME
    doiAgency = 'Not a DOI URL';
end

switch doiAgency

    case 'DataCite'
        request = ['https://api.datacite.org/works/' doi ];
        data = webread(request, options);
        data.data.attributes;
        type = 'DOI';
    case 'Crossref'
        request = ['http://api.crossref.org/works/' doi ];
        data = webread(request, options);
        obj = ClassArticle;
        obj.name =  strrep(data.message.title{1},sprintf('\n'),'');
        obj.datePublished = [num2str(day(datetime(data.message.created.date_parts))),'-'...
                             num2str(month(datetime(data.message.created.date_parts))),'-'...
                             num2str(year(datetime(data.message.created.date_parts)))];
        obj.sameAs = ['https://doi.org/' doi];

        try
            temp = strsplit(data.message.page, '-');
            obj.pageStart = temp{1};
        catch
        end

        % Assign publisher
        obj.publisher = ClassPublisher;
        try
            obj.publisher.name = data.message.publisher;
        catch
        end


        % Assign journal
        journal= ClassJournal;
        try
            journal.name = data.message.container_title{1};
        catch
        end


        % Assign volume
        volume = ClassVolume;
        volume.isPartOf = journal;
        try
            volume.volumeNumber = data.message.volume;
        catch
        end

        % Assign issue
        issue = ClassIssue;
        issue.isPartOf = volume;
        try
            issue.issueNumber = data.message.issue;
        catch
        end
        obj.isPartOf = issue;

        % Authors
        nAuthors = numel(data.message.author);
        if nAuthors > 30
          nAuthors = 30;
        end
        for i = 1 : nAuthors
            author(i) = ClassAuthor;

            if iscell(data.message.author)
                temp_auth = data.message.author{i};
            else
                temp_auth = data.message.author(i);
            end
            try
            author(i).givenName = temp_auth.given;
            catch
            author(i).givenName = ' ';
            end
            try
                author(i).sameAs = temp_auth.ORCID ;
            catch
            end
            try
            author(i).familyName = temp_auth.family;
            author(i).familyName = ' ';
            catch
            end
            try
                author(i).additionalName = temp_auth.middle;
            catch
            end

        end

        obj.author = author;

        type = 'DOI';
    case 'Not a DOI URL'
        % Check if it is a website
        %[data, status] = isawebsite(doi);
        %if ~isempty(data)
            obj = ClassWebsite(doi);
            obj_s = convertAndCleanObj(obj);
            type = 'WEB';
        %end

        % Check if is a book, ISBN 812651681X (sze)
        doi = strrep(doi,'-','');

        if strlength(doi)==10 || strlength(doi)==13 % length of an ISBN
            data = webread(['https://www.googleapis.com/books/v1/volumes?q=isbn:' doi], options);
            if data.totalItems > 0 % is a book
                obj = ClassBook;

                obj.bookFormat = 'Hardcover';
                try obj.datePublished = datetime(data.items.volumeInfo.publishedDate); catch  end
                obj.name = data.items.volumeInfo.title;
                obj.inLanguage = data.items.volumeInfo.language;
                obj.isbn = doi;
                obj.numberOfPages = data.items.volumeInfo.pageCount;
                obj.sameAs = data.items.volumeInfo.canonicalVolumeLink; % dependant

                publisher = ClassPublisher;
                try
                    publisher.name = data.items.volumeInfo.publisher;
                catch
                end
                obj.publisher = publisher;


                authors = data.items.volumeInfo.authors;
                for i = 1 : length(authors)
                    nameSplit = strsplit(authors{i}, ' ');
                    if length(nameSplit) == 1
                       nameSplit = strsplit(authors{i}, '.');
                    end

                    author(i) = ClassAuthor;
                    if length(nameSplit) == 2
                        author(i).givenName = nameSplit{1};
                        author(i).familyName = nameSplit{2};
                    end
                    if length(nameSplit) > 2
                        author(i).givenName = nameSplit{1};
                        author(i).additionalName =nameSplit{2};
                        author(i).familyName = nameSplit{3};
                    end

                end
                obj.author = author;
                type = 'BOOK';
        end
end
end
This function builds an Article object just like our main Article object for each reference, and assigns it to handles.data.article.citation{i}.
We can view all metadata we’ve just entered with the object tree viewer:
Finalising Files
After you have exported the figure files in the right format, move them to the local folder (where all other folders have been created) 000006\production\submission\figures (6 stands for manuscript number 6). Figure captions text files are automatically generated in one of the previous steps and are located in: 000005\production\temp. An example of caption would be <p>Figure 1 | Prof. X, Y University.</p>. These files are obviously empty, so you’ll need to write appropriate captions by dragging each of them into the MATLAB editor. Keep Figure X at the beginning of the caption.
Once all the txt files are ready press HTML (author), and press refresh… this will generate appropriate html files, which can be viewed from the popup next to HTML folder. The callback is:
GENERATE_AUTHORS_AFFILIATION_HTML
GENERATE_SECTIONS_HTML
GENERATE_REFERENCES_HTML
GENERATE_FIGURES_HTML
GENERATE_ARTICLE_LINE_HTML
GENERATE_AUTHOR_INFO_HTML
GENERATE_ARTICLE_INFO_HTML
GENERATE_YOUTUBE_HTML
These new HTML files include extra elements that add extra functionalities to the article page. This includes things like internal links for references; for example when you click on a reference like [1] a tab on the right side scrolls down and shows you the corresponding reference.
The script GENERATE_AUTHORS_AFFILIATION_HTML is the following:
% Here we generate the Authors list with tooltips
author = handles.data.author;
affiliationLine = ['<a class="btn btn-primary" data-toggle="collapse" href="#collapseExample"'...
                   'role="button" aria-expanded="false" aria-controls="collapseExample">'...
                   'Show Affiliations</a>'];
affiliationLine = [affiliationLine '<div class="collapse" id="collapseExample">'...
                   '<div class="card card-body">'];
affiliationLine  = [affiliationLine '<p><sup>*</sup> Corresponding authors</p>'];

nameList = ['<p>'];
aff_accumulator = []; aff_index = 0; letter = [];

for i = 1 : numel(author) % for each author
   if ~(i == numel(author))
       nameList = [nameList author(i).name ','];
   else
       nameList = [nameList author(i).name];
   end

   if isequal(author(i).roleName, 'Corresponding')
      nameList =  [nameList '<sup>' '*' '</sup>'];
   end

   for j =  1: numel(author(i).affiliation) % for each affiliation
       % check if affiliation is part of accumulator
       v = find(author(i).affiliation(j)== aff_accumulator);
       if isempty(v)
           aff_accumulator = [aff_accumulator author(i).affiliation(j)];
           aff_index = aff_index + 1;
           letter(aff_index) = char(aff_index+'a'-1);
           nameList = [nameList '<sup>' letter(aff_index) '</sup>'];
       else
           nameList = [nameList '<sup>' letter(v) '</sup> '];
       end

       if numel(author(i).affiliation)>1 && j< numel(author(i).affiliation)
           nameList = [nameList '<sup>,</sup>'];
       end
       if j == numel(author(i).affiliation)
          nameList = [nameList ' '];
       end
   end
end
nameList = [nameList '</p>'];

for aff_index = 1 : numel(aff_accumulator)
    affiliationLine = [affiliationLine '<p>'];

    affiliationLine = [affiliationLine '<sup>' letter(aff_index) '</sup> '];
    affiliationLine = buildAffiliationLine(affiliationLine, aff_accumulator, aff_index);

    if ~isempty(aff_accumulator(aff_index).address.email)
      affiliationLine =  [affiliationLine  '<br>' '<b>E-mail: </b>' aff_accumulator(aff_index).address.email];
    end
    affiliationLine = [affiliationLine '</p>'];

end

affiliationLine = [affiliationLine '</div></div>'];


fileID = fopen([handles.data.dataDir.production.paragraphs '11_author_line.txt'] ,'w');
fprintf(fileID, '%s', nameList);
fclose(fileID);

fileID = fopen([handles.data.dataDir.production.paragraphs '12_affiliation_line.txt'] ,'w');
fprintf(fileID, '%s', affiliationLine);
fclose(fileID);
And generates the following HTML code:
<a class="btn btn-primary" data-toggle="collapse" href="#collapseExample" role="button" aria-expanded="false"
    aria-controls="collapseExample">Show Affiliations</a>
<div class="collapse" id="collapseExample">
    <div class="card card-body">
        <p><sup>*</sup> Corresponding authors</p>
        <p><sup>a</sup> Cavendish Laboratory, University of Cambridge, CB3 0HE, Cambridge, United Kingdom<br><b>E-mail:
            </b>fnk23@cam.ac.uk</p>
        <p><sup>b</sup> Department of Engineering, University of Cambridge, CB3 0FA, Cambridge, United Kingdom</p>
        <p><sup>c</sup> Department of Materials Science and Metallurgy, University of Cambridge, CB3 0FS, Cambridge,
            United Kingdom</p>
    </div>
</div>
The newly generated files with the new HTML code will be pasted into specific fields created with Toolbox in WordPress. The can be opened directly from the app, by selecting the appropriate file next to HTML folder in the Processing tab and clicking on Open with Mat Editor.
Uploading Files
Files to upload to the server include: pdf of the article (see below), citation files (*.ris), and figure. These need to be uploaded to the appropriate folder using Filezilla (e.g. https://scivpro.com/articles/000004/).
Pdf files must be named as 10_32386_scivpro_000006.pdf for example.
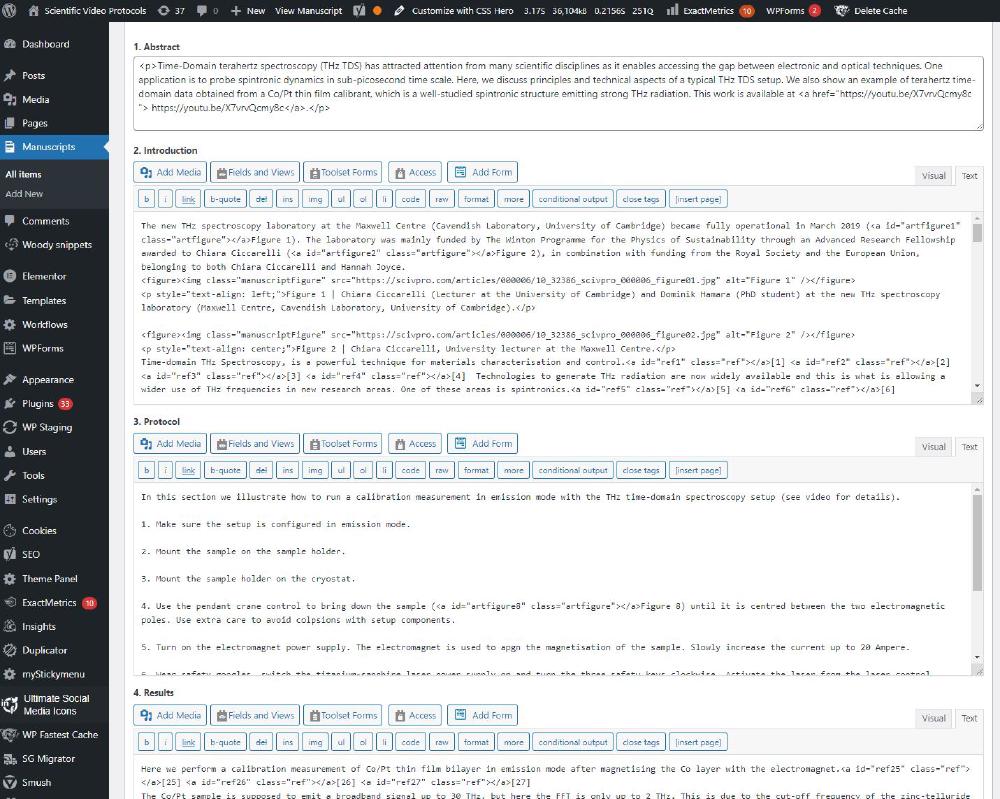
Editing the Article in WordPress
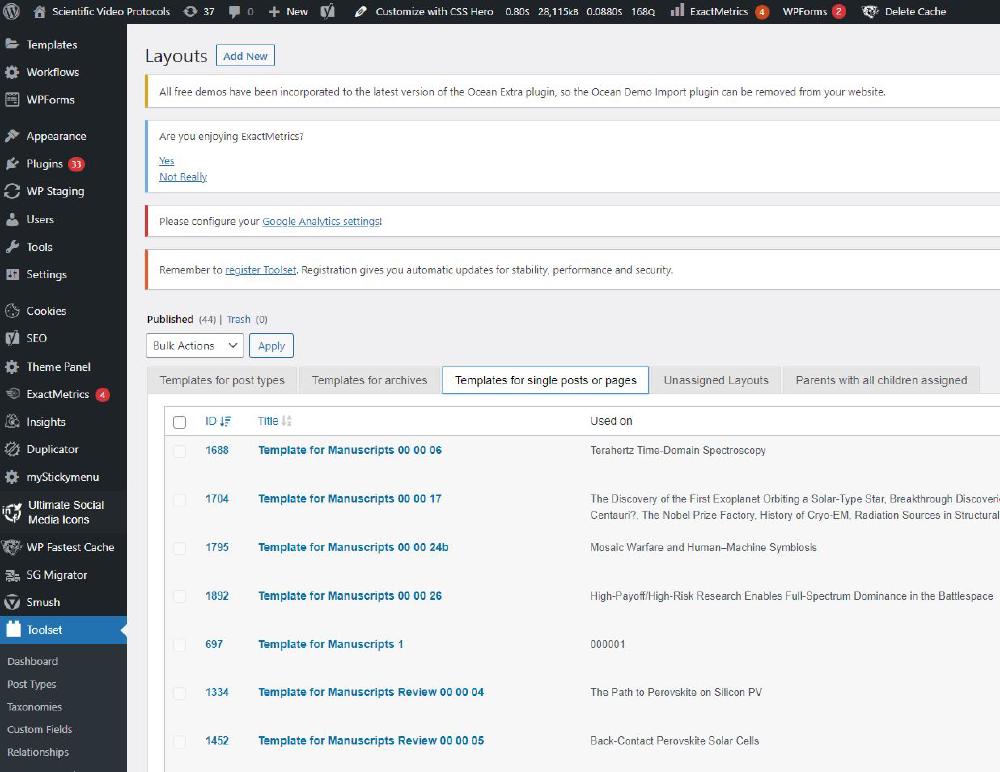
Toolset Article Template
The general organisation of the article structure is controlled by a Toolset template. Templates are found under Toolset -> Layouts. Select the tab Templates for single posts or pages.
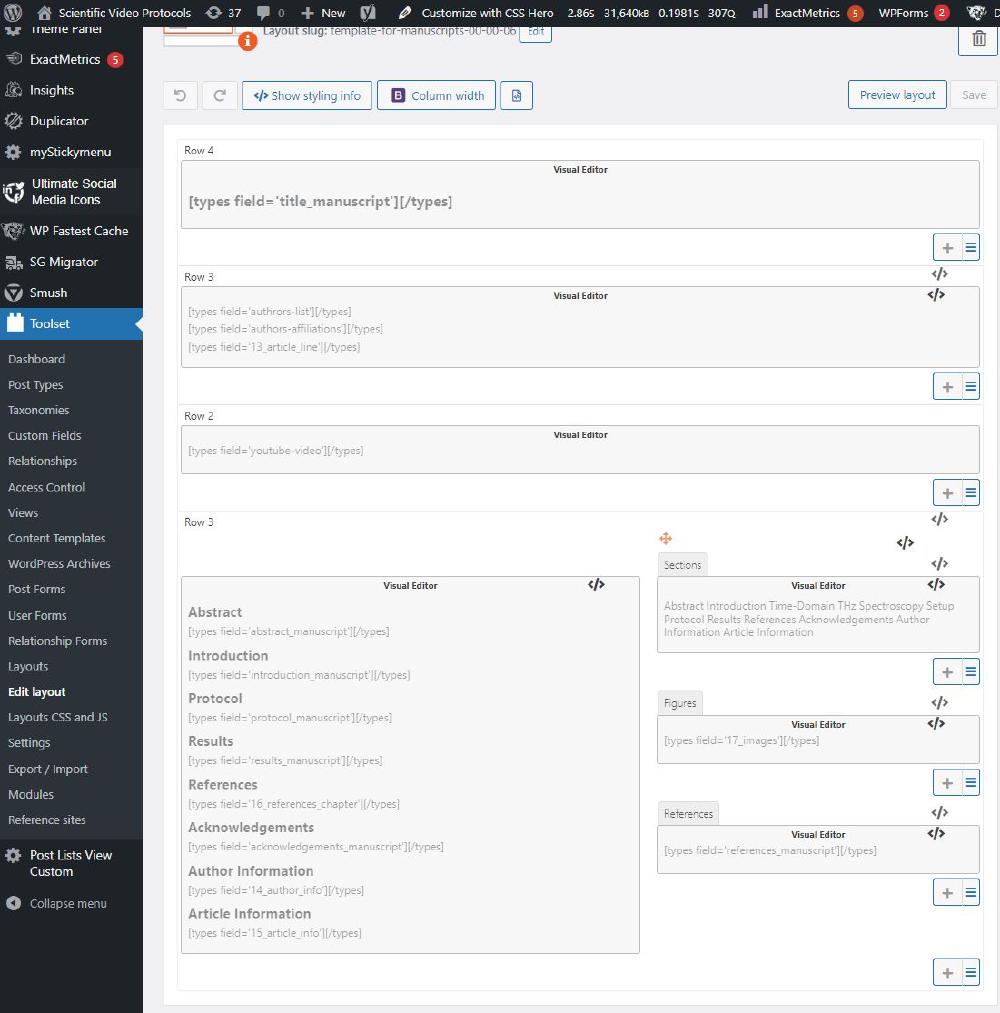
This is the template used for manuscript 000006:
Clearly if you are not happy about this layout, you can duplicate and rename it. It will be available under Unassigned Layouts. Change the slug and modify its scope to Sections.
In each blow we have bits of Toolset scripts like:
<h1 class="manuscriptTitle">[types field='title_manuscript'][/types]</h1>
This means that whatever we enter in the field title_manuscript will be inserted here. There are many other fields throughout the template: authors-list, authors-affiliation, 13_article_line, etc. As you can see some of these fields correspond to the HTML files discussed above.
Depending on the sections we have in the actual article, we will need to modify the Sections tab on the right end side. This is navigation element on the right hand side of the article that allows you to view all figures in the article, navigate each section of the article, and view all references. This is how it is coded in the layout:
<div class = "chapterList">
<hr class ="hr2">
<p><a href ="#abstract">Abstract</a></p>
<hr class ="hr2">
<p><a href ="#par1">Introduction</a></p>
<hr class ="hr2">
<p><a href ="#par2">Time-Domain THz Spectroscopy Setup</a></p>
<hr class ="hr2">
<p><a href ="#par3">Protocol</a></p>
<hr class ="hr2">
<p><a href ="#par4">Results</a></p>
<hr class ="hr2">
<p><a href ="#references">References</a></p>
<hr class ="hr2">
<p><a href ="#acknowledgements">Acknowledgements</a></p>
<hr class ="hr2">
<p><a href ="#author_info">Author Information</a></p>
<hr class ="hr2">
<p><a href ="#article_info">Article Information</a></p>
</div>
In HTML, # symbol is used in hyperlinks to indicate that the link is pointing to a specific location within the same web page. For example, when used in <a href='#par'>, the #par part after the # symbol is the target location’s ID (an anchor) within the web page. When the user clicks on the hyperlink, the browser will scroll to the target location (the element with the specified ID) on the same page. This is useful for creating navigation menus that jump to specific sections of a long web page.
As a note there was absolutely no reason for editing the layout here. This could have been done at a field level.
When we will edit the various fields, we will need to substitute the <h2>Introduction</h2> headings with something like:
<p class = "anchorChapter" id = "par1">
<h2 class = "Chapter">Introduction</h2>
This is the target for the internal link <a href ="#par1">Introduction</a>.
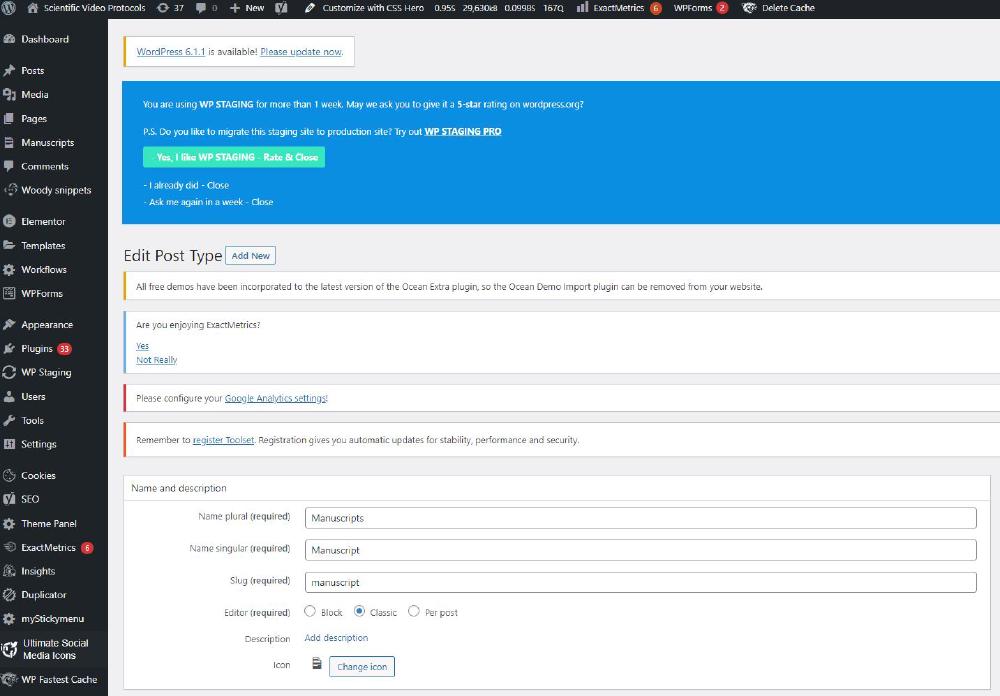
Custom Post Types
Articles in this WordPress site are custom post types created with Toolset and called Manuscripts. They can be created from Toolset -> Post Types. Once a new custom post is created it will appear on the left navigation menu of WordPress:
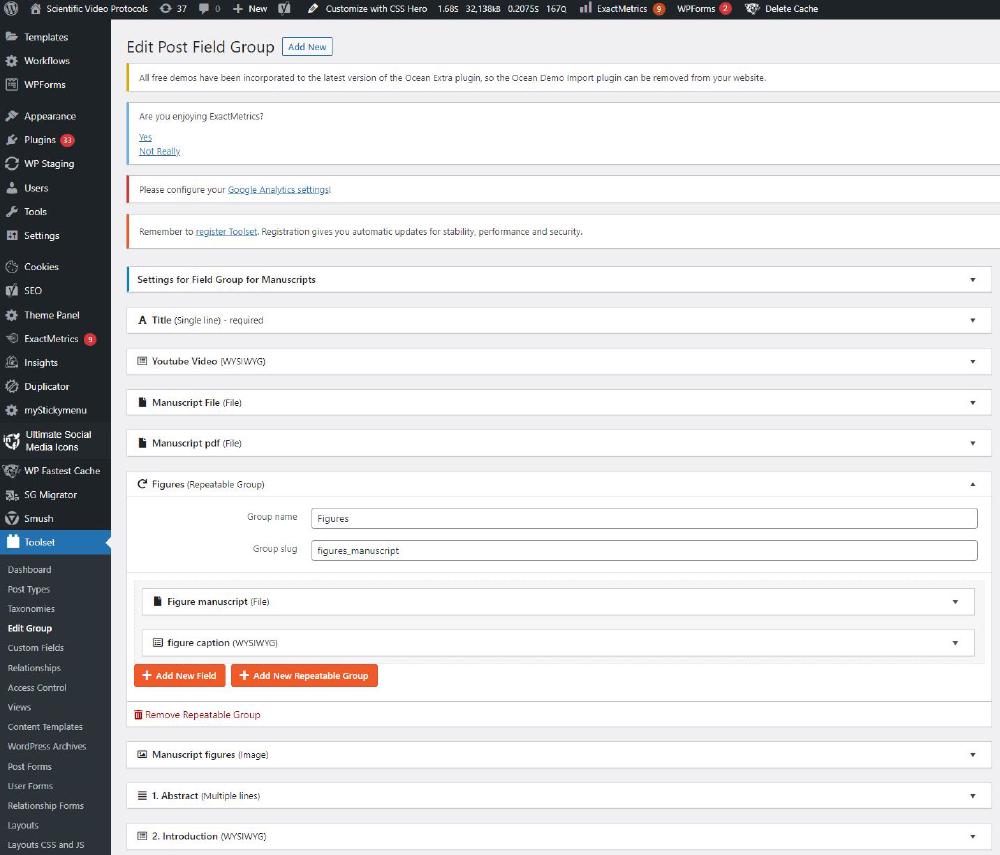
Custom Fields
Custom fields are accessible from Toolset->Custom Fields. Here we have a Field group for Manuscript that looks like:
Each field can be different things, for example a single line, rich text, or even a file. These are the fields we will fill up with the HTML text files once we create an instance of an Article (Manuscript). The way these fields are arranged in the Article page is controlled by the template I discussed above.
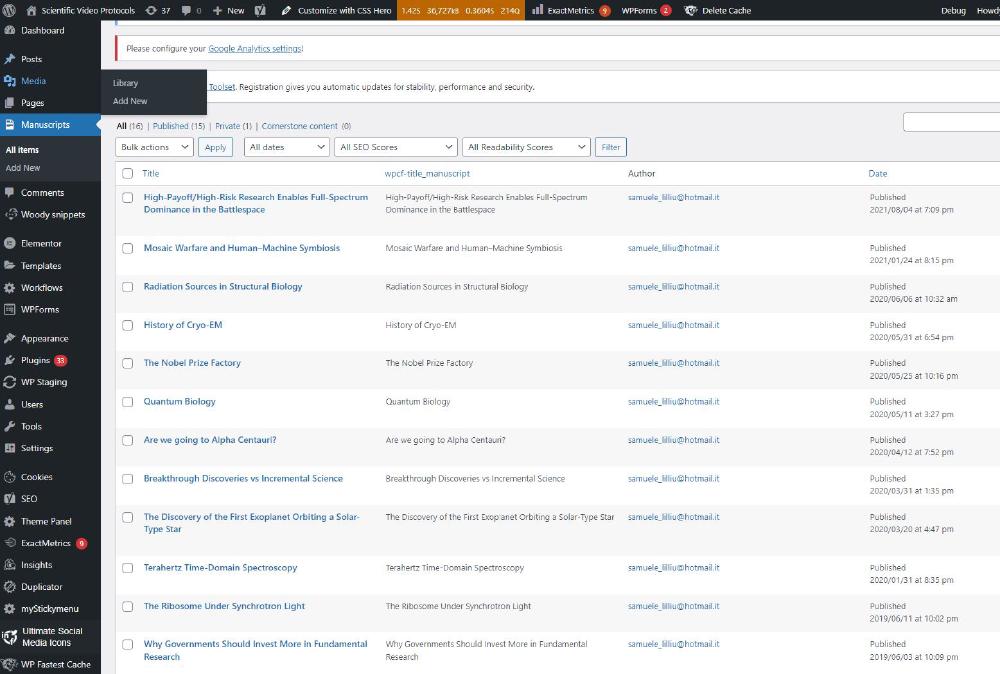
Creating a new Article (Manuscript)
The easiest thing to do is probably to duplicate an existing one. Go to Manuscripts -> all items -> duplicate. This is the Manuscripts section:
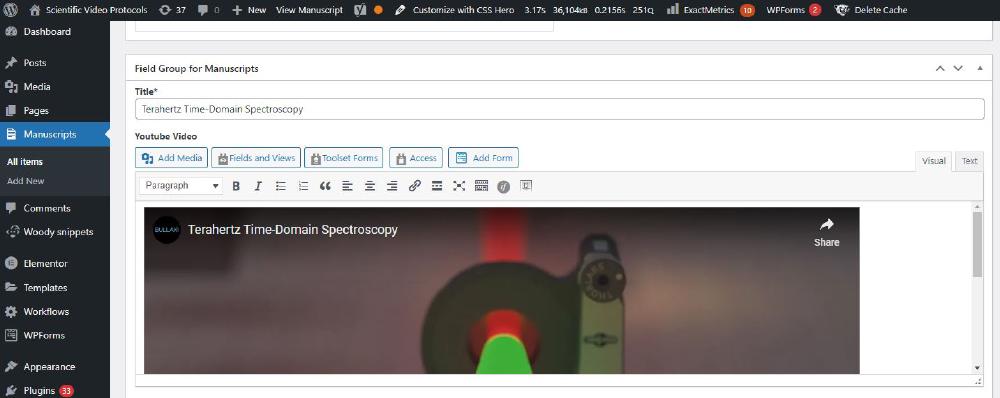
This is the page for the article we’ve been discussing above:
These are exactly the fields were we paste the HTML text files.
We absolutely need to ensure that the permalink is something like: https://scivpro.com/manuscript/10_32386_scivpro_000006/. Once you register a DOI with CrossRef this permalink should never change.
On the right side of the page we also need to assign the right template to the present article. Here we also control if the page is public or private.
If you scroll to the bottom you will see a section for JSON-LD. JSON-LD (JavaScript Object Notation for Linked Data) is important for publishers displaying peer-reviewed articles on their journal pages because it provides a standardized way to represent structured data in a format that is both machine-readable and human-readable. For publishers, using JSON-LD to mark up their web pages can enhance the visibility and findability of their articles. Search engines, such as Google, can use the structured data provided by JSON-LD to understand the context of the content on a page and display it in a more meaningful way in search results. Additionally, JSON-LD provides a way for publishers to include information about the peer-review process, authors, and publication details that may not be readily available in the main article content. This information can help increase the credibility and trustworthiness of the article in the eyes of potential readers and researchers.
The MATLAB application generates the JSON-LD file (json_ld.txt) for the manuscript based on the article object parameters we entered earlier after you press Generate JSON LD. This calls the following:
article_ = struct();
article_ = recursiveStructConvert(handles.data.article,article_);
main.a_context = "http://schema.org";
main.a_graph{1} = article_;
main.a_graph{2} = [] ;
text = jsonencode(main);
newStr = strrep(text,'a_','@');
fileID = fopen([handles.data.dataDir.production.paragraphs 'json_ld.txt'],'w'); % open([workDir 'json_ld.txt'])
fprintf(fileID, '%s', newStr);
fclose(fileID);
This code recursively explores the object tree, converts each object into a struct, and finally converts the struct into a JSON file.
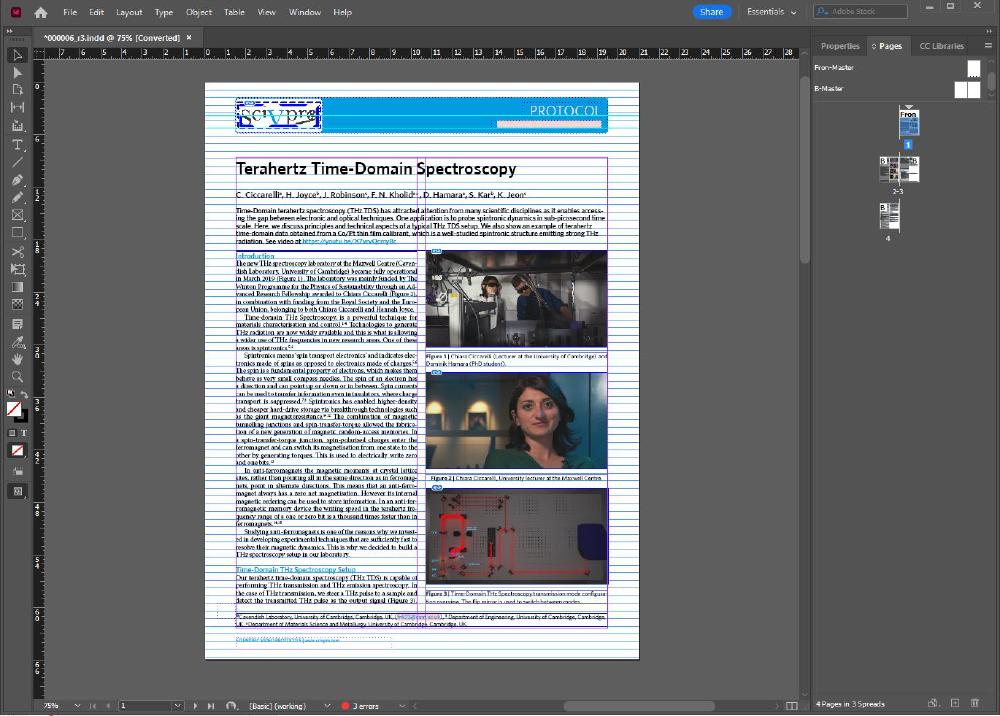
Generating the Article PDF
This is done by combining an Adobe InDesign template I’ve created with a Word template. The Word field containing the article is imported in InDesign, which then automatically translates each article section, for example headings or Normal text, into custom paragraphs with specific fonts, font sizes, etc.
This is the InDesign Template:
And this is how it looks like after importing the Word file:
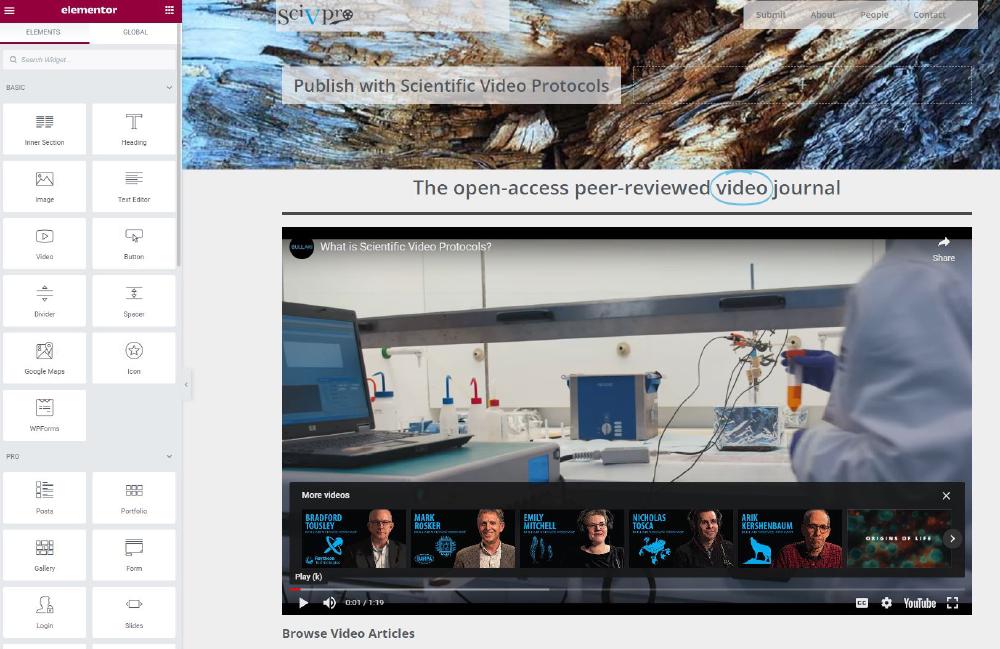
Website Styling
The entire website styling is made with Elementor (+ custom CSS).
Source Files
MATLAB source files will be available on GitHub.